By Emily Malloy
Ethereal and majestic. Feminine and lovely. These are words that come to mind when discussing flower crowns. Why is it that we swoon over flowers that adorn the head? Perhaps it is more than just the loveliness, but the impermanence of a flower that adds to its wonder?
Instead of a crown of jewels, we have a fragrant crown of whimsy that draws attention to the beautiful countenance of the wearer; particularly when the wearer is the Cause of Our Joy for the May Crowning.

In the construction of flower crowns, not all flowers are up to the task. More often than not, smaller, more airy blooms will be the best ones to use.
In the floral arrangement tutorial from March, there was an image highlighting the functionality of certain types of flowers and greens: i.e. focal, filler, greenery, etc. Those same principles carry over into creating a crown. The majority of the flower crown will be made up of fillers and airy items and a handful of focal blooms. Of course, you can go big with a majority focal bloom crown (I have been known to do this), but word to the wise: they can be much more delicate to handle and rather heavy to wear!

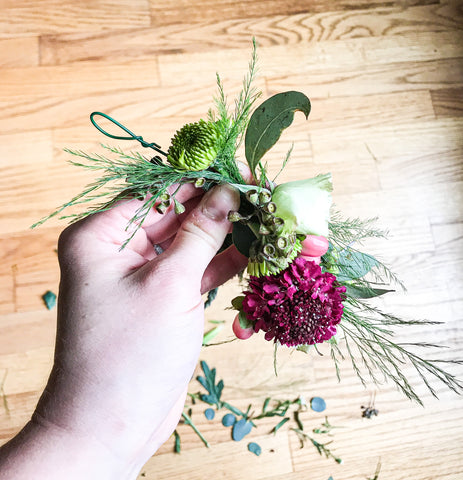
There are several approaches that can be taken in arranging blooms onto a crown, but I have found that creating little boutonnieres that you affix onto the wire helps create a stabilized and fuller piece.
**Note: You can make the floral crown up to a day in advance, but keep it fresh by placing it into a plastic bag in the refrigerator until ready to use.**

The needs for your flower crown are very simple: (1) a piece of floral wire (20-24" length will do), (2) floral tape, (3) snips, (4) thin ribbon, and (5) an assortment of flowers. As you can see in the photo, I have an assortment of smaller blooms, textures, and greens.
In this flower crown I used tulips, spray roses, scabiosa, fever few, eucalyptus, asparagus fern, hypericum berries, and button mums.

1-4: Take your wire and create loops on the ends. Do this by first making a hook and taking the ends to twist around the wire several times to secure it.

4 and 5: The most important part of a floral crown (other than having the flowers, of course) is to make sure that you have "enacted" your floral tape. This is done by simply tugging the tape to stretch it. You will see that the tape will lighten a shade of green and will now properly stick! Make sure that you are pulling on your tape as you go. It's what keeps the whole thing together!
6: As I had mentioned above, I prefer the creation of a crown by the compilation of many small boutonnieres. It really is the simplest mode of construction for a full crown. For my "focal blooms", I most often like to use smaller focal blooms like a tulip or spray rose. You can also use larger flowers, but once everything begins to be added to the crown, it can easily become overwhelming and too large, so it's easiest to stick to daintier focals.
7: At the "neck" of the focal, I place a texture or airy accent, holding it in place.

8 and 9: Add a linear/airy piece in the back of the grouping to add some height and dimension. Also tuck in a small bit of greenery around the outside of the flowers to finish the look.
10 and 11: This shows a different way of making a small grouping-- framing the focal bloom with some small accents, linear/airy pieces toward the back and greenery to finish off the look. Secure the grouping by wrapping floral tape at the gathering point where your fingers held it together.

12-15: To begin securing the little boutonnieres onto the wire, hold it against the wire, take the floral tape and twist it around and around, using the tape to hold it onto the wire. As you spin the wire, the tape should continue down the stems, going around several times to ensure it's sturdily affixed.

16-19: Continue layering the boutonnieres down the length of the wire, making sure that no gaps are showing. The underside of the flower crown will show all of the taping, but don't worry-- this is the part that will be up against the head and won't be visible.

After you work the entire way around fastening on flowers from end to end, it is time to finish the crown. One of the best ways to finish off a flower crown is by tying ribbon into the looped ends of the wire. It adds a beautiful finish, but is also helpful when you aren't completely sure the size of the head (or statue) the crown will be placed upon.

20: Cut two pieces of ribbon, equal length. Take the first piece and fold it in half, ends touching.
21: Feed the folded portion through the loop of the wire. Pull the loop through just an inch or two.
22 and 23: Take the tails of the ribbon and feed it through the loop and pull tight. Repeat on the other side of the crown. You're all finished!

Of course, you must test out the design on a willing model!

