By Emily Malloy
Is there anything more hospitable than baking a beautiful loaf of bread? Even if it’s simply for your own enjoyment, there is an undeniable joy that follows pulling a freshly browned loaf from the oven. Bread among friends is an even more glorious occurrence.

Hospitable? It may seem like a strange descriptor for bread, but I honestly think it’s the most appropriate way to speak of bread baking. As it bakes in the oven, bread creates an unmistakable and unrivaled aroma within the house. The scent of cookies or cakes may elicit excitement from the beholder’s nose, but nothing conjures delight quite like the scent of bread.
Consuming freshly baked bread is an experience. And so much love goes into its creation, more so than other baked goods. Hence my argument that bread is a hallmark of hospitality.

Bread was my first introduction into baking. It was something I was determined to get a feel for because I felt if I could confidently bake a loaf, other forms of baking wouldn’t seem as difficult.
Nearly a decade later, my hypothesis has proven correct. It isn’t that it is the most difficult type of baking, it’s that it is seemingly the most intimidating. I am determined to change that perception.
It should be said that I still make mistakes even though I identify as a seasoned bread baker. I’ve been hasty and undercooked loaves. I have forgotten salt. I have subsequently forgotten that I had already added salt and, for fear of forgetting salt, over-salted.

But, like anything else, you get back onto the horse after falling. And bread is much simpler than riding.

It is my goal in this life to encourage just one person to give bread baking a go and to help him or her feel confident while baking. Nothing helps confidence quite like a showstopper of a loaf coming from your hands.
A twisted or braided loaf takes the art of baking to a new visual level. I promise there is little to fear and the extra steps it requires is completely worth the effort.

Not to forget the flavors! They come together in a beautiful way. It’s not only a joy to create, beautiful to take in, but also a pleasure to eat. All food should be this way!
As ever, fresh basil is marvelous. The ricotta creates a wonderful texture and flavor within the loaf. And the honey? Well, it just brightens the entire creation!

Honey Basil Ricotta Bread
Time: 2 1/2 hours+
Yields: 10-12 servings
Ingredients:
3/4 cup whole milk (warmed to 110*F)
2 1/4 teaspoon instant yeast
3 large eggs
3 1/2 - 4 cups all-purpose flour**
1/2 cup honey, separated
1 1/2 teaspoons kosher salt
4 tablespoons unsalted butter, room temperature
1/2 cup fresh basil, finely chopped
1 cup whole milk ricotta, room temperature
1 tablespoon minced sage
1/2 teaspoon lemon juice
3 tablespoons melted unsalted butter
Directions:
1. In the bowl of a stand mixer, or regular mixing bowl, combine 3 tablespoons of honey with the warm milk and yeast. Let sit for 5 minutes to bubble to proof the yeast.
2. In a separate bowl, whisk together the flour and salt. Add to the milk/yeast mixture and make a small well in the middle of the flour. Add the eggs and butter.
3. Mix on low (if using a stand mixer) until well combined using a dough hook.
4. Place into a greased bowl and loosely cover to rise for an hour or until doubled.
5. In a small bowl, combine the remaining honey, ricotta, lemon juice, basil, and sage. Set aside.
6. Punch the dough down and place onto a well floured surface. 
7. Roll the dough out to make a 12" x 18" rectangle.

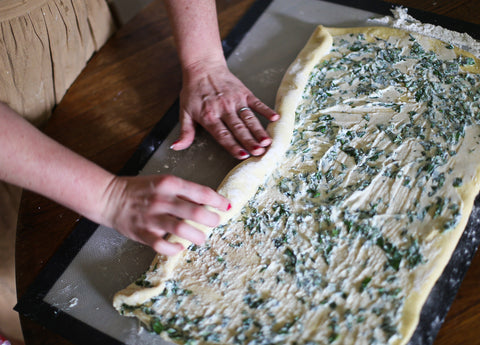
8. Spread the ricotta mixture over the entire surface, making sure it is evenly covered.

9. With the widest edge closest to you (the 18" side), tightly roll the dough to form a log.

10. Pinch the edge to seal.

11. Using a sharp knife, cut the log in half lengthwise. Turn the halves upward to expose the filling.

12. Pinch the top of the halves together and begin twisting the dough together.

13. Upon twisting the dough and making one long log, coil the ends as if it were a snake down toward the center, one twisting to the left, the other to the right.


14. Place onto a prepared baking sheet. Cover with a clean dish towel and allow it to rise for an hour.

15. Preheat the oven to 350*F. Bake the loaf for 30-35 minutes or until lightly browned.
16. Baste with melted butter as soon as it comes out of the oven.

**NOTE: I cannot stress enough that climate can greatly change the amount of flour that is needed to create the right consistency. Slightly sticky, but not wet is the goal here. It was a particularly humid and rainy day here in Mississippi, so I nearly needed 4 1/2 cups of flour. Seeing as such a humid climate as this is far from the norm for most bakers, I have given a more common range to work from in the recipe. On most days, this recipe would require 4 cups of flour for my region, but that one day was a doozy!**

